


Monday, 16 December 2013

LDAP Enumeration Tools And Counter Measures
LDAP Enumeration Tools And Counter Measures
When we covered LDAP enumeration we left tools part for discusing later. Now its time to have a look on every tool one by one. Lets start with LDAPminer, a free command line tool
.
LDAP Miner:
Download LDAP Miner from,
http://sourceforge.net/projects/ldapminer/
LDAP miner is free LADP enumeration tool. It is written in C and source code is also available for study and modification. It can collect information from different types of LDAP servers by identifying its type of server and then fetching specific information.
Syntax:
ldapminer.exe -h host/IP_address option
We have discussed options in LDAP Enumeration. Better use -d option
Example:
C:\Ldapminer>ldapminer.exe -h 127.0.0.1 -d
replace 127.0.0.1 with IP address you want to scan.
JXplorer:
JXplorer is a free general purpose LDAP browser used to read and search any LDAP directory. It needs Java virtual machine for installation and execution.
Some of the powerfull features of JXplorer includes,
-Supports standard LDAP operations {add,delete, modify}
-Can copy and delete tree structure
-SSL and SASL authentication
-Pluggable security providers
-Multiplatform support including Windows, Linux, Solaris, HPUX, BSD, AIX
-HTML type data display

JXplorer has many features that can not be easily included in scope of single post, I’ll better recommend you read their online manual for updated infomation on how to use JXplorer.
Softerra LDAP Browser/Administrator:
It is free LDAP client designed specially for windows. It is capable of detecting and accessing different types of LDAP directories and can support following Open Standards,
DSML
XML-RPC
XSLT
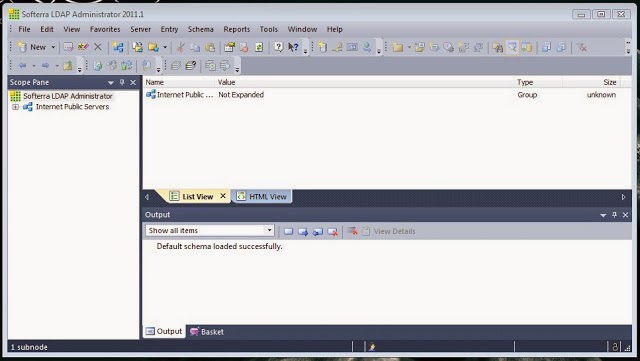
Since its functionalities are not limited as compared to JXplorer using it is not a kid’s job, better have a look on their online manul for more information on usage.
Prevention Against LDAP Enumeration:
Now that’s really tough job since preventing an Active Directory from LDAP enumeration is not quite piece of pie because its not really possible to prevent it from users accesing it from internal network. To solve this problem you will need a software named Citrix. Now as an intelligent question you might ask why Citrix? Because Citrix provides power of virtual computing and authentication that means none of the user will be allowed access to Active Directory unless he/she passes Citrix Session by disallowing anonymous LDAP queries. For more information visit www.citrix.com .
Understanding LDAP enumeration is little difficult from enumerating other things because there are lot of things that had to bought into condsideration and the attacker must have good knowlegde of at least Windows 2003 and Active directory configuration. If understanding LDAP enumeration is proving difficult for you don’t get disappointed, better read few tutorials about Windows 2003 configuration and Active Directory(can be easily found on by googling) you will surely get hands on it soon. Thanks for reading and keep visiting.
LDAP Enumeration
LDAP Enumeration
The Lightweight Directory Access Protocol(LDAP) is used to access directory listings within an active directory or from other services. A directory is compiled in hierarchical or logical form. It is suitable to attach with the Domain Name System(DNS) to allow quick lookup and fast resolution of queries. It generally runs on the port 389 and other similar
protocols.
Sometimes, it is possible to query LADP service anonymously. The query can reveal information like valid usernames that can be further used for performing attacks.
Both command line and graphical tools are available for enumerating LADP.
LdapMiner:
It is command line tool that collects information from different LADP servers by identifying its type of server and then fetching specific information.
Syntax: ldapminer.exe -h host_ip options
-p [port]: default is 389
-B [bind]: default user null
-w [password]: default user password null
-b [base search]: search user, group
-d [dump all]: get all information
Example:
C:\>ldapminer.exe -h 127.0.0.1 -d
We will cover how to use Graphical tools in next section to this. Till next post just remember JXplorer and Softerra LDAP Browser are graphical tools available to enumerate LADP.
DNS Zone Transfer
DTransferNS Zone
In this post we will learn about DNS zone transfer in windows 2000 server. Before we continue to zone transfer, lets clear some of our doubts about zone transfer. In windows 2000 server clients use service records known as (SRV) to locate domain name services. The service records may include services like Active Directory*. This means every windows 2000 domain must have a DNS server for its network to operate.
So in all a windows based domain has two DNS server, the one which keeps information is known as primary DNS and the one who updates its information from it is known as secondary DNS.
*Active Directory: Active Directory is a scalable directory service that stores information about networking components, and makes this information easy for administrators and users to find and utilize. A directory is a listing of objects that uses a hierarchical structure to store information about objects such as users, groups, computers, and applications. This structure is often referred to as a tree, as it starts with a root and develops from there. Active Directory acts as the central authority for security, and it brings together various systems as well as management tasks.
Now question arises why 2 DNS?
So here’s the answer, windows 2000 is very much integrated with DNS (Domain Name System) and Active Directory heavily relies on DNS for finding objects in directory. Since DNS is used for providing name resolution to IP addresses windows 2000 domains has to be kept compatible with them.
Windows server manages a Dynamic DNS specially for providing services via Active Directory, this is done because services can manage them-self if they operate dynamically whereas a static DNS has to be managed and monitored manually. While static DNS will work, Dynamic DNS should be used to maximize the benefits of Active Directory. Data is replicated to each DNS server when Active Directory’s replication is used. Redundancy and fault tolerance can also be provided when other domain controllers are configured as DNS servers and make changes to the DNS information.
Now what is zone transfer?Zone transfer is a method via which a secondary DNS server tries to update its information from primary DNS. An attacker can fake out its computer as secondary DNS and can retrieve information from primary DNS. Even a simple nslookup command can reveal lot of important network information.
How to perform zone transfer manually?:
Open command and type following commands one by one,
c:\>nslookup
>set all
>domain_name
>ls -a domain_name

In above image you can see I tried a zone transfer, the output shows that the remote server has refused DNS zone transfer. Output will be different when you’ll try it on a server that supports zone transfer.
Here I am listing out several tools that can be used for zone transfer but my choice is SuperScan.
Command Line Tools:
User2SID
ENUM
SID2User
UserInfo
Graphical User Interface:
GetAcc
SMBF
SuperScan
Counter Measures Against DNS Zone Transfer:
Configure the server to respond only to authorized IP address for zone transfer.
Add IP address that will be allowed for zone transfer.
Countermeasures Against SNMP Enumeration
Countermeasures Against SNMP Enumeration
In last section we saw how we can enumerate SNMP. Since SNMP can reveal plenty of information that can be used for hacking, it is quite necessary to prevent SNMP enumeration. In this post we will learn how we can create a strong defense against SNMP enumeration.
The best way to avoid SNMP enumeration is to remove SNMP agent from target system or turn off the SNMP service. If that is not possible then follow the following steps.
Enable the option in Group Policy Security option called Additional restrictions for anonymous connections. Also restrict access to null session pipes, null session shares and IPSec filtering.Additionally block access to TCP/UDP ports 161.
SNMP Enumeration
SNMP Enumeration
I know SNMP enumeration is not really a hot topic as per today but still I think we must cover it for educational purpose. So before we proceed lets have our look on some basic terminologies related to SNMP.
What is SNMP?: Simple Network Management Protocol i.e SNMP is an application layer protocol used to manage TCP/IP based networks.
SNMP Agent: A device that can communicate with SNMP protocol.
SNMP Manager: It is an entity which sends requests via SMNP to its SNMP agents.
MIB: Management Information Base (MIB) provides a standard representation of SNMP agents available information and where it is stored.
Traps: Traps let the SNMP manager know about activities at SNMP agent. Activity might be reboot, device failure or any other suspicious activity.
SNMP requests/response are sent over UDP port number 161 and notifications are sent over port number 162.
What is SNMP Enumeration?: It is process of using SNMP to enumerate user accounts and devices on a target system. SNMP has two passwords to access and configure the SNMP agent from the management station. The first is called a read community string. This password lets you view the configuration of the device or system. The second is called the read/write community string, its for changing or editing the configuration on the device.
By default read community string is public and read/write community string is private. If these passwords are not changed they can be used by an attacker to enumerate SNMP as SNMP Manager. If the default password is not as above other default passwords can be found on www.defaultpassword.com.
SNMP Enumeration Tools:
SNMP Util:
SNMPUtil is a command line tool which gathers Windows user accounts information via SNMP in Windows system. Information such as routing tables, ARP tables, IP Addresses, MAC Addresses, TCP/UDP open ports, user accounts and shares can be obtained using this tool.
Syntax:
C:\>snmputil {get|walk|getnext} {machine name} {Object Identifier}
get: This command gets the value of the requested object identifier.
getnext: This command gets the value of the next object that follows the specified object identifier.
walk: You use this command is used to step through (walk) the Management Information Base (MIB) branch that is specified by the object identifier.
Object Identifier: It specifies branch of MIB as defined in SNMP protocol. They are long, clumsy number which are really very difficult to remember. They all have their string equivalent but even they are hard to remember. Following is list of sting values,

ren’t they hard to remember therefore I would not recommend this tool to anyone because remembering all those stuff is damn difficult. We have an excellent graphical tool instead of this tool I’ll better advise you to opt it.
Example:
C:\>snmputil.exe walk 192.22.0.24 .server.svSvcTable.svSvcEntry.svSvcName
This will list services.
IP Network Browser:
IP Network Browser is tool from Solar Winds Engineers Tool Set. It is graphical tool and can be easily used for SNMP enumeration.

Solar Winds Engineers Toolset

IP Network Browser
I think there is no need to explain working of IP Network Browser because it is damn easy to use.
In upcoming post we will cover defenses against SMNP enumeration. Till then don’t forget to let us know about your views on this post and ask if you have any difficulty.
Restrict Anonymous On NetBIOS
Restrict Anonymous On NetBIOS
In previous posts we saw how we can enumerate NetBIOS manually then by using tools. Here we will have our look on how we can counter NetBIOS Enumeration and null session attacks on system. Null session attacks can be avoided by restricting anonymous connections over NetBIOS. It can be done in following manner.
Press “Win+R”, a “Run Window” will come up, type “regedit” in it and open registry editor, alternatively you can type “regedit” on command prompt and access registry editor.
For Windows XP/2000 create following registry key:
HKLM/System/CurrentControlSet/Control/LSA/RestrictAnonymous=2
Now reboot your system.
For Windows XP Professional and Windows 2003:
HKLM/System/CurrentControlSet/Control/LSA/RestrictAnonymous=1
HKLM/System/CurrentControlSet/Control/LSA/RestrictAnonymousSAM=1
Now reboot your system.
For Windows NT 4.0 or further:
HKLM/System/CurrentControlSet/Control/LSA/RestrictAnonymous=1
Now reboot system.
Further remove hidden share IPC$, stop SMB services, to perform these tasks open command prompt and type,
C:\>net share IPC$/delete
C:\>net stop SMB
Now configure your firewall to disallow services asking for connection over NetBIOS by blocking ports 135, 137, 138, 139.
NetBIOS Enumeration Tools
NetBIOS Enumeration Tools
In our last section we covered how to enumerate NetBIOS manually. Now we will have our look on tools that can be used for NetBIOS Enumeration . There are several Graphical User Interface (GUI) tools as well as Command Line Interface (CLI) tools available, here I will list only some of them and tell you about my personal preferences.
GUI Tools:
SuperScan:
You might be knowing we have already covered superscan before leaving enumeration part for this post. Now since we covered basics of enumeration I hope you'll not encounter problem using “Windows Enumeration” option in superscan.

MAC Address: Media Access Control (MAC) is unique address given to Network Interface Card(NIC)
RPC Endpoint Dump: Remote Procedure Call (RPC) is a service that runs on a system and allows remote task execution. Every RPC service uses TCP/UDP protocol to communicate with clients. There might be case that an RPC is allocated port number dynamically with or without static IP address. Here RPC Endpoint service comes to play, it tells procedure about the port number RPC is using.
I hope we have already covered all other terminologies related to enumeration.
WinfingerPrint:
WinfingerPrint is tool of my choice for enumeration. It have nearly everything for enumerating a windows system and it also supports batch processing.

CLI Tools:
Please note that each command line tool provides its own switches for operation. Please have a look on their help pages for information on how they work. There is no unneccessary details available on help pages than swtiches and their use. They hardly make 15-20 lines, so please go through them to grasp material throughly.
THC-Amap:
It is next generation scanning and enumeration tool. It performs fast and reliable application protocol and port detection. Banner grabbing via amap is almost impossible to detect.
NBTScan:
As a command line tool NBTScan is my choice. It performs full test and creates HTML file as an output unlike other command line tools.
Other Tools For NetBIOS Enumeration
1.Hyena
2.Dumpsec
3.NetBIOS Auditing Tool
4.NBTEnum
Here we complete our NetBIOS enumeration, in further post we will discuss how to prevent NetBIOS enumeration and then pick up topic SNMP enumeration. Till then don't forget to tell how was the post and please feel free to ask if you have any difficulties.
NetBIOS Enumeration And Null Session
NetBIOS Enumeration And Null Session
Net BIOS null Sessions occurs when you connect any remote system without user-name and password. It is usually found in systems with Common Internet File System (CIFS) or Server Message Block (SMB) depending on operating system. Once attacker is in with null session he/she can explore information about groups, shares, permissions, policies and even password hashes.
Null session attack uses vulnerability in SMB protocol for creating connection because it uses SMB uses trust for any kind of relationship between devices available in network.
By default null sessions are enabled in Windows 2000 and Windows NT. Actually it is also enabled by default in Windows XP and Windows 2003 Server but they don't allow enumeration of user accounts. Any of the following port must be open to perform NetBIOS enumeration and null session attacks because they represent SMB and NetBIOS is supported by network.
Port 135 - Remote Procedure Call (RPC)
Port 137 - NetBIOS Name Service
Port 138 - NetBIOS Datagram Service
Port 139 - NetBIOS Session Service
Please note that all above services may use any of the TCP or UDP protocol.
The method to connect to remote system via null session requires you to connect to any device or share. By default in all windows systems Inter Process Communication (IPC$) runs as hidden share($ denotes share on remote system). We can say that IPC is null session share.
Now to check whether the system is vulnerable to null session or not type following commands.
C:\>net use \\IP_Address\IPC$
For example
C:\>net use \\192.168.56.1\IPC$
Next type
C:\>net use \\IP_Address\IPC “”/u:“”
where “”/u:“” denotes you want to connect without user-name and password. Now explore further information.
C:\>net view \\IP_Address
will show you list of shares, computers, devices, etc.

So here we complete how we can manually perform NetBIOS Enumeration and Null Session attack. In further posts we will cover some tools that are used for the above purpose and then available countermeasures. Till then practice above method of enumerating NetBIOS and tell me if you have any difficulty. You can try your own IP address(127.0.0.1) to enumerate if you want. Please ask if you have any problem using above commands and please practice hacking is practical thing you can never learn without practicing.
Nessus On Linux
Nessus On Linux
In last tutorial we saw how to use nessus on Windows. But as told earlier nessus is multi-platform vulnerability scanning/assessment tool. In this section we will cover how we can use nessus on Linux platform. The installation process in Linux is not as straight forward as in Windows. So lets cover it first.
Since Nessus is supported by number of Linux distros we will list some most commonly used Linux distros to demonstrate installation process. Download nessus for your respective Linux Distro.
For Red Hat, Fedora, Suse Slackware:
#rvm -ivh <nessus_package_name>
For Debain, Gentoo, Ubuntu and its varients:
#dpkg -i <nessus_package_name>
Next step will be adding users since nessus runs as client-server even on Linux box, to add user type following command without any option.
# /opt/nessus/sbin/nessus-adduser
After typing above command it will ask you about details of user you want to add. Provide details and password. Next type the command as it is, sent for nessus registration by Tenable to your inbox. To start nessus server type,
# /etc/init.d/nessusd start
Once your nessus server starts connect to it via browser typing following command,
https://127.0.0.1:8834
If you are connecting nessus for first time your browser will surely give error as faulty SSL connection select “continue anyway” or “add to exception”. Whichever appears on your browser screen. Rest you can continue as you did in Windows
Subscribe to:
Posts (Atom)


